

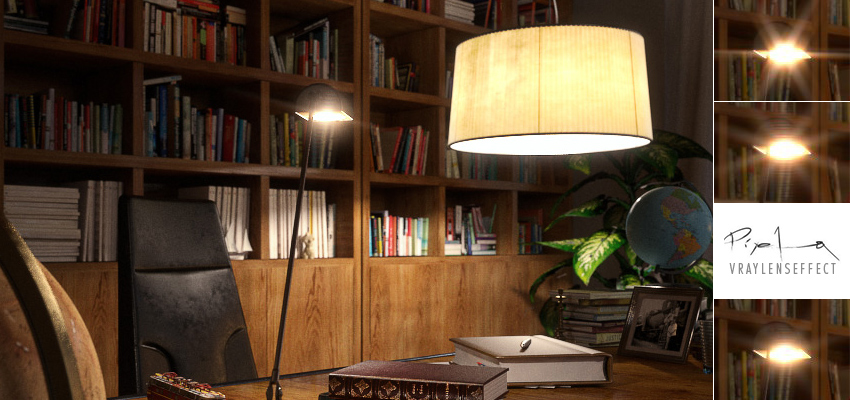
A mon avis, celui-la vous l’attendez depuis longtemps! Le Vray Lens Effect fait parti des sujets à traiter impérativement depuis la sortie de V-ray 2.0. C’est donc Alfa Smyrna, plus connu sous le pseudo Pixela, qui nous propose un tuto complet sur son utilisation.
Ce tuto est publié en anglais, vous pouvez utiliser la fonction traduire du blog ->
Histoire de quand même vous présenter un peu Alfa avant d’attaquer, sachez qu’elle a déjà fait une apparition sur ce blog à l’occasion du tuto sur l’utilisation du Clamp Output et depuis cette première discussion, nous continuons de résoudre ensemble ces petites galères techniques et graphiques qui font notre quotidien. Niveau boulot, pas grand chose à dire si ce n’est que ses images parlent d’elles mêmes! Je vous invite egalement à lire le sujet « Rosso by Alfa Smyrna » sur le blog ainsi que sur le forum de Ronen Bekerman.
Introduction
Hi everyone!
During the last few days, I was playing around with Vray Lens Effects, which is a new feature that arrived with V-ray 2.0.
I prepared this tutorial for my friend Matt Guetta’s blog to share my experiments with this new creative and fun tool. First of all, I must say that V-ray produces very nice results with few seconds and you can play around with parameters to get the effect as you like.
Vray Lens Effects produces glare and bloom effects which are artifacts of real life cameras, when shooting bright objects. In real life photgraphy, bright objects can cause the light passing through the camera get scattered inside the lens and can produce internal reflections. Another thing that can happen is that these objects can change the emulsion of the film to bleed and can cause some bleeds. In V-ray 2.0, the new Lens Effects are introduced to produce these artifacts.
Activate the VrayLensEffects
It is activated from the Environement & Effects menu (which is 8 in keyboard ). On the Effects Rollout, add « Vray Lens Effects » and select « active ».

At this stage, both gloom and flare is disabled. Now we need to make our render. Click « update the scene » button and the render will start.

Applying the VrayLensEffects
When our render is ready, it only takes few seconds to apply the effects and watch the results which is rare in Computer Graphics 🙂 So I must say, it was fun to play around with this tool. Now enable Glare and click « Update Effect ». We will be using this button to see the result when we make a change on any parameters.
As you see, in just a few seconds we can see the effect on our render.
« Update scene » option is to be used only when you make a change in the scene. For all the setting changes in VrayLensEffects window, click the Click « update effect » button.
Mode parameter determines if the bloom will be applied to the RGB image or stored in a separate render element, or both. I selected Image and Render Element parameter as the mode setting. When you choose this, V-ray puts the Lens Effect in a separate Render Element as well as it applies it directly on the image. So When you look at the VFB, you will see 2 new render elements : LensEffectSource, Glare ( and the third one Bloom if you enable this too.)

LensEffectSource is a helper element which V-ray uses to calculate these effects and in Bloom and Glare pass we see our effects as separate passes.
Under parameters of glare, first one is the camera. We can use directly our render camera and necessary parameters such as f-stop and blades will be taken from render camera to calculate the glare. Here in this tutorial I selected « from camera parameters », which takes camera parameters specified in VrayLensEffects window. By this way, we can assign different values and test different settings. for the f-number and the number of blades. (On this rollout at the bottom.)
Adjust the VrayLensEffects
First let’s change the number of blades in our camera and see the effect.
Click « update effect »:
As you see, we get a very different effect as the blades as this parameter controls the rays in glare. Now change the f-stop. Click « update effect », Larger values cause a stronger glare.
Bitmap parameter is enabled only if we choose « From image » and the glare is filtered according to this image specified. Here you can specify any aperture image and the effect will be calculated considering this. Here are some aperture images and one example created with one of these images :
You can create these bitmap filters using Filter generator which comes with V-Ray for 3ds Max installation. Weight parameter specifies the strength of the interpolation between the filtered image and the original image.
Size parameter specifies the size of the effect. Now let’s enable bloom and Click « update effect »:
Again:
- The weight parameter specifies the strength of the interpolation between the filtered image and the original image
- The size parameter specifies the size of the filter as percentage of the image’s width.
You can adjust settings and each time click « update effect » to see the result on your frame buffer.
Now please notice how the effect changes evidently when we change the number of blades again.
There is also another parameter which you can apply a bitmap as an obstacle image. In real life, there can be dirt or dust on the lens or any type of obstacle you can think of such as filters or anything you can think of. Here is the same image with a bitmap applied as an obstacle image. Notice the big difference between the previous and this one, achieved with the use of an obstacle image.
And here is the final image with some curves and color adjustment.

Glare and Bloom effects are artifacts caused by the lens in real life photography and VrayLensEffects lets you produce these effects and produce very realistic results within few clicks and adjustments.
I hope this tutorial is useful for you.
Cheers for everyone 🙂
Je vous invite à retrouver Alfa Smyrna:
- Portfolio d’ Alfa Smyrna
- « Rosso by Alfa Smyrna » blog et forum de Ronen Bekerman.
Très bon tutorial, j’utilise le VrayLens depuis quelques temps maintenant.
J’ai encore quelques problème avec je ne sais pas vous, au moment d’update mon effet en post je dois souvent rendre à nouveau mon image, Je contourne le problème grâce au VFB History mais ça reste gênant.
Many thanks for sharing.
Pierre.
This is a great read. Thank you Alfa 😉
I never tried the new V-Ray lens effects yet… added to the list of things to do (it is so long now…)
Cheers
Très sympa ce tutorial d’Alfa, c’est clair que les VrayLensEffect rendent particulièrement bien. Comme dit Ronen la « to do list » dans notre métier n’est pas prête de s’arrêter. 🙂
Toujours intéressant ces tutos 🙂
Perso je fait ça en postprod sur after. Je trouve un peu « risqué » sur une anim de le faire dans Max.
Par contre il y a ce Lenseffect source en RE qui peu être intéressant a récupérer dans AE 😉
Very interesting, Thanks!
Merci!
Hi 🙂
I see the comments JUST today. I am happy if it has been useful.
And…
Je ne sais pas parler Francaise 🙁
Only this and few more words.
Salut
Euh le truc bête… on peut sélectionner les lights afin d’exclure celle dont on ne veut pas d’effet lens ?
Pas trouvé…
Merci pour le tuto !
Roland
Fantastic, a good tutorial,
can you send me the scene with materials please?
How can this effect be applied when there are more lughts in the scene? Thanks!
@ArhitectuYou don’t apply this effect to lights. It is an post render effect so it doesn’t matter how many lights there are in the scene.
beau tutoriel ! Merci beaucoup du partage !
Je fais des tests et je vois que je ne peux que voir un meilleur resultat dans frame buffer de 3dsmax
Comment voir les résultat dans le Vray Frame buffer ?
Great information ! by the way, i was trying to figure out how to exclude an object from vray lenseffect , like i dont want the bloom effect on certain object in my scene, but however it applies on everything ! ?
any body is having vray lens tool download link kindly send me.please..